
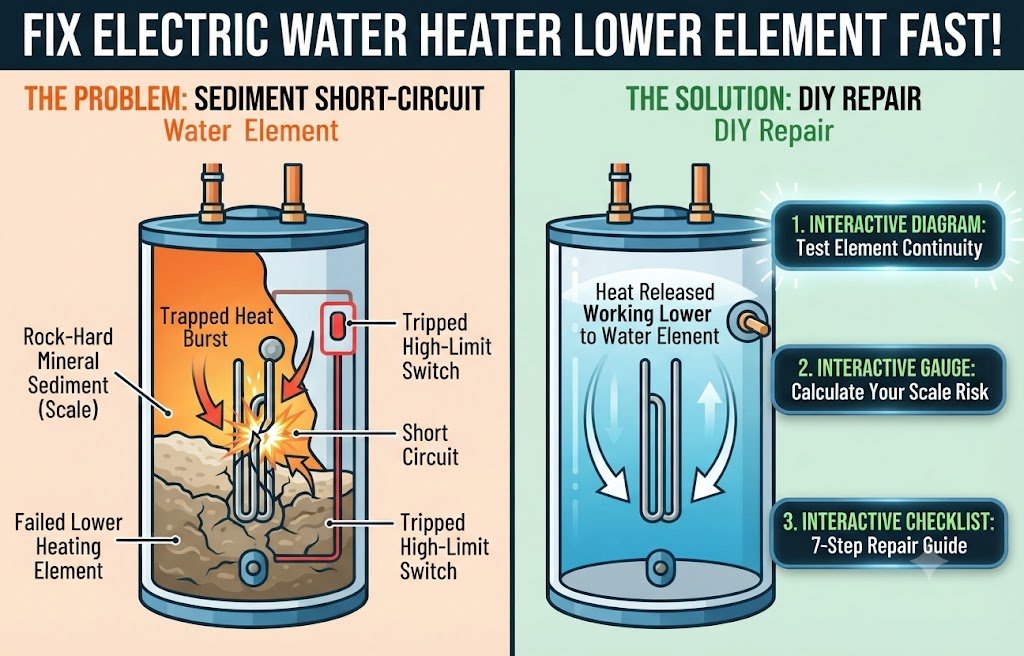
An electric water heater lower element failure starts the moment your hot water turns ice cold and you discover that your lower element has burned out. This indicates that electrical power is flowing, but heavy mineral accumulation around the lower element has created a destructive thermal barrier. You are facing a classic lower element failure caused by the sediment short-circuiting trap, but understanding the exact mechanical trade physics behind an lower element failure allows you to diagnose and replace the lower element safely, saving you hundreds of dollars in professional plumbing fees while restoring your electric water heater lower element function.
The Thermal Physics of an Electric Water Heater Lower Element Burnout
Inside the steel tank of your residential appliance, water is heated by resistance components—an upper component and an electric water heater lower element that does roughly 80% of the heavy lifting when cold water enters the base.
Over years of service, minerals dissolved in hard municipal or well water precipitate out of solution when heated, settling permanently at the bottom of the tank directly over your lower element. Because the electric water heater lower element sits near the very bottom floor of the tank, it becomes completely buried beneath a thick, rock-hard layer of mineral sediment.
Unlike water, which absorbs and carries away thermal energy efficiently, sediment acts like a heavy wool blanket over the electric water heater lower element. The heat generated by the lower element cannot escape into the surrounding water. This trapped thermal energy causes the copper sheath and internal resistance wire of the lower element to rapidly superheat, expand, crack open, and short circuit against the metal flange—triggering the high-limit reset switch or tripping the circuit breaker due to the failing electric water heater lower element.
Step-by-Step Diagnostic & Protocol for an Electric Water Heater Lower Element Failure
Diagnosing and replacing an electric water heater lower element requires basic electrical testing and plumbing draining. Follow this precise protocol to service your lower element:
- Kill All Electrical Power: Shut off the double-pole circuit breaker servicing the tank at your main electrical panel before touching any lower element wiring. Never work on an electric water heater lower element with live 240-volt power active. For official guidelines on residential electrical safety regarding your lower element, consult the Consumer Product Safety Commission.
- Test Continuity with a Multimeter: Remove the access panel and insulation blanket over the lower thermostat connected to your electric water heater lower element. Disconnect the wire leads and touch your multimeter probes to the lower element screw terminals. A reading of infinity (OL) or an open circuit confirms a dead lower element.
- Drain the Tank: Attach a garden hose to the bottom drain valve, shut off the cold water supply inlet, and drain the tank completely to expose the electric water heater lower element port.
- Remove the Burned Element: Use a specialized wrench to unbolt and extract the old electric water heater lower element from the tank wall, taking care not to damage the rubber O-ring gasket sealing surface of the lower element.
- Flush Residual Sediment: Flush out the remaining rock-hard mineral buildup from the bottom of the tank using a pressure nozzle or wet-dry vacuum before installing a new lower element.
- Install and Test: Screw in the replacement electric water heater lower element with a fresh gasket, refill the tank completely with water to prevent dry-firing the new lower element, restore electrical power at the breaker, and verify proper heating recovery from your brand-new lower element.
Interactive Diagnostic Tool: Water Heater Element Risk Estimator
Use this interactive expert tool to evaluate the expected lifespan of your electric water heater lower element. See below how to find your water hardness level.
Interactive Water Heater Scale & Element Lifespan Simulator
Homeowners can determine their water hardness level through several direct methods:
- Municipal Water Quality Report: Checking the annual Consumer Confidence Report (CCR) provided by their local water utility, which typically lists total hardness in grains per gallon (gpg) or parts per million (ppm).
- DIY Test Strips: Using an affordable at-home water hardness test strip dipped directly into tap water to instantly match the color scale against calcium and magnesium thresholds.
- Liquid Titration Test Kits: Using a drop-by-drop chemical test kit where drops are counted until the water sample changes color, offering precise gpg measurements.
- Soap Suds Test: Performing a quick diagnostic by shaking tap water with liquid dish soap in a closed bottle; a lack of lather and milky water indicates hard water
🛠️ What should we break down next? Let us know your suggestions in the comments—or drop us a line directly through our Contact Page!